


Accomplished aquatic designer and builder Paolo Benedetti is passionate about the details of proper construction and adherence to applicable codes and standards. In that spirit, he shares a simple method for testing a pool's bonding grid, a necessary measure to help ensure bather safety.
I was recently working on a construction defect case in a pool with seven lights. We discovered that there was no internal bonding wire inside the niches. There was no green wire coming in with potting compound on the connection, which is what you would expect in terms of an internal bonding wire.
 The top light niche has no secondary bonding wire, leaving it vulnerable to unequal electrical potential, compared to the lower niche, which is properly bonded. (Photos courtesy of Paolo Benedetti)
It's a common mistake and critical to note that when using PVC conduit, instead of the red brass of the past, you need a secondary bonding connection. In the old days, the brass conduit functioned as a secondary bond connection. In this situation, there was only a single bond wire on the back of the niche connected to the steel, and that's simply not adequate.
According to the National Electric Code 680, without two connections — meaning a secondary wire that runs back to the junction box from each light niche — the resistance in the loop will vary. Two connections are a necessity.
Not knowing any better, the builder in this situation argued that because each niche had a wire connected to the steel (which was in turn bonded to a junction box on the equipment pad) and because one of the niches did have a wire run back to equipment pad, the system was therefore properly bonded.

That's incorrect simply because the resistance of the steel and concrete increases with distance (much like our roll of test wire). The further away a niche is from the niche with the "homerun" bonding wire, the greater the impedance between the niches. The purpose of the bonding grid in the first place is to ensure every metal component around the pool has the same resistance.
That's why the technical name for a bonding grid is an "equipotential bond," meaning all the metallic components in a pool or spa should have equal resistance.
TO THE TEST
I bring this up for one very simple reason: Maintaining equal potential/resistance for all metal components and equipment is critical to ensure safety. When imbalances (or unequal resistance levels) are present, it's possible that someone who comes into contact with such a component can become the path to ground with the least resistance. And that can result in an electrical shock hazard.
Beyond that major concern, unequal resistance can result in a host of problems stemming from stray current, a related but also separate topic.
So, how do we determine the resistance of each component? Fortunately, it's relatively simple. After having studied this issue at considerable length, here's an easy and reliable testing method.
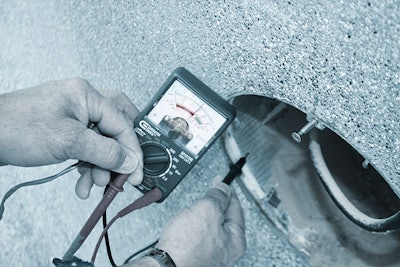
Required tools • An analog ohmmeter (Meter with a needle, not digital). Available at Home Depot for $10 • A roll of wire (long enough to extend from the pool equipment pad to the furthest point to be tested); common 14-gauge copper wire will work. • Alligator clamps (attach one to each end of the roll of wire)
Testing Procedure
STEP 1 - Zero out (or calibrate) the meter (making an allowance for the roll of wire):
Attach one of the ohmmeter leads to one end of the roll of wire. Attach the other ohmmeter lead to the other end of the wire. The meter will display a measurement (it is measuring the resistance of the roll of wire). Use the calibration dial to return the needle to zero.
You are now ready to start.
STEP 2 - Testing
Using an alligator clip, attach one end of the roll of wire to an exposed bonding wire at the equipment pad. Unroll the amount of wire necessary to reach the furthest component to be tested. Connect the other alligator clip end of the wire to one of the ohmmeter test leads. Use the other probe without the alligator clip to take readings of various metallic components by touching it to them. The needle should remain close to zero. If you are using the 10X scale, multiply any readings by 10 to get the true Ohms.
That's it. If you find readings above zero, then you know that those components are not properly bonded.
The following items should read zero ohms of resistance:
• Pool heater • Pool pumps • Any piece of pool equipment that is metal (e.g. the pool controller or time clock box) • Related circuit panels, conduits, unistrut, wire gutters and chases • The internal grounding bar of all pool light junction boxes • The external bonding lug of all light junction boxes • The metal parts of the diving board, slide, deck anchors, umbrella sleeves, fountainheads, spillways, waterfalls, etc. • Anything containing over 4 square inches of metal that is within 5 feet of the pool (in any direction): downspouts, hand railings, steel in the pool deck concrete, window frames, metal skimmer lids & drains, pool cover tracks, lids; HVAC venting, sheet metal, directional louvers; metal framing or foundation reinforcing steel of an enclosure building, etc. • Swimming pool light niches can only be tested with the water removed from the pool. When installed, the stainless steel (SS) light fixture's face ring should read zero. The SS straps inside of a plastic light niche and body of a SS niche should also read zero.
Again, if these components show a resistance other than ZERO, then their bonding is corrupt. It means that the continuity is broken or there is a poor connection somewhere.
National Electric Code 680 also requires that the water of the pool be bonded. This can be achieved if there is a properly bonded heater, light niche, bronze handrail anchor or metal umbrella sleeve in the pool. Otherwise, a length of bonded stainless steel pipe or a bonding probe can be added to the plumbing at the equipment pad.
Section 680 also requires that the decking, or in the case of a deckless pool or one with concrete paving stones, that the soil surrounding the pool be bonded. This can be achieved through the use of a copper mesh or a #8 copper wire that encircles the pool. The copper bonding loop must be attached to the pool's reinforcing steel at four locations that are spaced equally around the perimeter.
Vinyl liner or fiberglass pools that do not have reinforcing steel must have a copper grid placed below them prior to installation. The copper mesh under such pools must then connect to the decking loop in four locations.
Comments or thoughts on this article? Please e-mail [email protected].