


Designer/builder Steve Swanson of The Pool Company, based in Clayton, Calif., is passionate about proper construction techniques. As a result, he’s worked on many projects that involved fixing other people’s mistakes. Here, he shares a story about how he engineered a major repair for a vanishing wall that was not only incorrectly built, but then altered with an inadequate quick fix.
Sometimes, for any number of reasons, mistakes can and will happen. Despite our best efforts to achieve perfection in our work, every once in a while, something, somehow, is going to go wrong. It’s part of life and certainly part of doing business.
That’s abundantly true in the swimming pool construction industry, where a variety of technical elements must correctly come together in order to create a successful project. Although failures are most often associated with so-called “production builders” notorious for trying to squeeze every penny out of every job, even the best crews and finest artisans will, every now and then, miss the mark.
When that happens, the question should not be whether or not a mistake was made, but instead how one chooses to correct the situation. Do you try to cover your tracks with the quickest fix possible, or own it and take the time to step back and consider the best way to mend the error in a way that will last?
RELATED: Minimizing Mistakes
Over the years, I’ve tackled a number of renovations and repairs in situations where the original builder simply didn’t take care in remediating his original missteps. It’s impossible to know whether those types of mistakes are due to a lack of knowledge or, far worse in my opinion, the desire to move on as quickly as possible and just hope for the best.
Either way, a bad fix will, sooner or later, compound problems rather than correct them. This is one of those scenarios, offered here purely as a cautionary example.
THE PROBLEM
I was installing a project in the same neighborhood as the job pictured here. The homeowner paid a visit to the site and struck up a conversation with a mason working on another part of the property. As a courtesy, the mason went over to take a look at the problem, but was forced to admit he didn’t really know what was going on. The homeowner I was working for at the time later told his frustrated neighbor that she should talk to me about it.
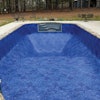
When I eventually got around to inspecting the project, it was clear something went terribly wrong with the vanishing edge. I could see the telltale signs of water penetrating from the front of the wall to the backside, resulting in scale, cracking and efflorescence.
The builder had opted for a rolled bond beam and used a pebble surface over the top of the edge, extending from the tile line on the inside of the pool, over the weir and down the backside of the wall. That was the first mistake I discovered, because as we know, for all of their value when used correctly, pebble surfaces are subject to failure in wet/dry applications. In this case, we were looking at alkali silica reactivity — a sure sign something was wrong, but it wasn’t the only problem I saw.
In addition to the problem with the surface material, I saw fissures on the base of the interior tile line, meaning water was moving from one side to the other. I was puzzled to see the original builder had come back and done some type of repair where they tiled over the weir, which made no sense because it was curved. Nothing about it looked right and I was left wondering what they were trying to achieve by covering the edge with tile.
DIGGING DEEPER
In order to find out what was really going on, we convinced the homeowner to let us strip the tile off the top of the wall and remove the pebble surface from the backside of the wall and the catch basin. When the surface materials were removed, we saw a number of areas where the gunite was deteriorating, with even greater evidence of water penetration.
Upon closer inspection, we soon realized that the builder added as much as four inches of mortar to the top of the wall to raise the edge elevation, presumably so it would function with the pool’s skimmers. There was no reinforcing steel in the added mortar and no apparent attempt to create a reliable bond between the original gunite and the new cap material. Now, some eight years later, the entire top of the wall was failing.
It became unfortunately clear that rather than correct the situation the right way, the builder went for the quickest fix he could think of. I was somewhat surprised, given that this particular builder enjoys a strong reputation for quality work.
To be clear, when using tile or natural stone on the top of an edge, you normally allow for an inch or so due to the thickness of the tile or stone as well as the float material and thin set. That’s very different than using mortar to raise the wall by four inches with no structural steel or some type of bonding material.
Be all of that as it may, I was left to engineer a fix that would be structurally sound and not allow any moisture migration through the wall.
THE FIX
Once I explained the situation to the homeowner, he agreed to let us correct the problem once and for all. So, literally in this case, into the breach we went.
After removing all of the mortar and the damaged gunite, we epoxy-dowelled in rebar on 6-inch centers and bent the steel to create latitudinal bars that tied the existing gunite into the new build-up material. Depending on the application, any time you have more than an inch and a half of cementitious material, you need some kind of steel reinforcement. You also must apply some type of bonding agent to ensure the new material properly adheres to existing gunite.


For the bonding agent, I turned to the same thinset I use for glass tile: Laticrete Platinum 254, a wonderfully tenacious, waterproof, latex-based thinset. I mixed it to a pancake-batter consistency, then painstakingly brushed and sponged it onto the substrate, covering all the small spaces between the steel. We immediately followed with the mortar before the thinset skimmed over, just as you would in a tile installation. (That last point is critical because if the material starts to set, you won’t have a good bond, which defeats the purpose of using a bonding agent.)
The material I used to rebuild the edge, i.e. the “cap mud,” was a hybrid type of concrete I developed specifically for these types of repairs. I start with a 5,000-concrete material and augment the mix with white cement, Berylex waterproofing agent, fiber-mesh and Oly #2 plaster sand. The result is a super-strong mortar material that has the ability to fill in all the nooks and crannies while having the aggregate size necessary to make up the mass, workable to a tight finish.
(Side note: Over the years, I’ve come to use fiber mesh, or “stealth” fiber in all situations where we’re rebuilding portions of a cementitious structure. It helps with shrinkage and provides added integrity to the mass. To be clear, that is not a substitute for reinforcing steel.)
The forming was also extremely precise — instead of re-pebbling the whole pool, we tried to preserve the pebble finish on the interior surface with as little scarring as possible. To do so, we used special Tapcon concrete screws to affix the forms to the inside surface of the wall and took our usual precautionary measures to make sure the dimensions were as close to perfect as possible on both the outside and inside of the wall. (In this case, the high point was on the inside with the edge surface canted away from the pool.)
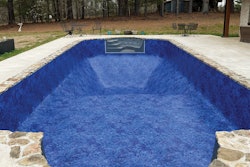
Rather than re-pebble the top of the edge, which was amazingly the original builder’s suggestion for the fix, we tiled the top of the edge using all of the standard setting and waterproofing measures we would have had we built the pool in the first place.
I’m proud to say that when we were finished, the edge was “dead nuts!”
THE TAKEAWAY
The lesson learned here is simple in concept but admittedly difficult in execution: When you discover a serious mistake, you need to carefully consider and identify a solution that doesn’t expose the work to future failures. Yes, the builder made a huge mistake in missing the vanishing edge wall dimension by four inches. Although that’s inexcusable, mistakes, and even big ones like that, can and do happen.
But for your own good (and especially that of the client), don’t turn to an equally substandard fix. The time and expense you go to in developing a permanent solution will save all sorts of trouble later on, and who knows, you might even learn something about materials and construction techniques in the process.
RELATED: Pursuing Perfection
When you do take the high road in these types of situations, it can be wonderful to discover that it is possible to turn a negative to a positive. Most clients I’ve found can forgive a mistake, but they won’t be happy at all if and when they discover you’ve tried to cover it up.

SURFACE TRANSITIONS
While inspecting the pool, I noticed that? o?n the spa? wall?, the builder had made up the tile’s horizontal to vertical transitions using grout. That’s a common practice that needs to stop — immediately! When using exposed grout for that critical interface, it inevitably gets hammered by the elements and very often will eventually fail.
Whether it’s the sun, corrosive effects of chlorine, water with low pH or all of above, that bead of tile will deteriorate and allow water penetration. A short time later, the grout will fail and the tile will pop off. I’ve seen this time and time again on spa dam walls, vanishing edge walls and other areas. It’s one of the most common reasons for failed tile installations not related to ground movement.
Instead, use quarter-round or surface bullnose tile on those key transitions. It seems so simple I can’t help but wonder why so many builders opt for an approach that is almost guaranteed to disappoint.
Comments or thoughts on this article? Please e-mail [email protected].