At the height of the busy swim season, people rarely think of pool covers. But summer will soon begin to wind down, and many service techs and homeowners will turn their attention to fall and the need to cover up their pools for winter closings. Even though thinking about the onset of winter may be somewhat discordant or even challenging in the summer swelter, doing so can save time, money and long hours as the days get shorter and the list of closing customers grows longer.
According to David Thompson, president of Swimming Pool Services in Waukesha, Wis., the fall season often results in a rush on cover orders that can bog down his operation, which closes approximately 700 pools each fall. "We do everything we can to encourage homeowners to order their covers early in the season," he says. "That way if there's a problem with a cover for some reason, there's more time to take care of it."
Thompson's company is a dealer for Rayner Covering Systems, which offers tiered price discounts for early ordering. Thompson passes the manufacturer discounts along to clients as a way to incentivize early orders. His company also puts every pool through a careful inspection when opening in spring, both to identify necessary repairs and to let homeowners know if they should consider ordering a new cover in anticipation for closing in fall.
RELATED: With Winter Pool Covers, End With the Start in Mind
That's really the best time to decide whether a pool needs a new cover.
"We turn around the tiered pricing to motivate those early orders," he explains, adding that about half the clients that need new covers take advantage of the early order pricing.
"We tell our customers that if they wait to September or October to order their covers they'll be paying more, and if there's any kind of delay they might be waiting until November or later to close their pool."
Such incentive programs help smooth out the ordering/installing season, but regardless of when your crew begins covering pools this fall, here are some basic measures that help ensure a mesh safety cover is properly in place, secure and ready for the harsh winter winds and snow.*
5 Helpful Installation Tips For Mesh Covers
1) Proper positioning:
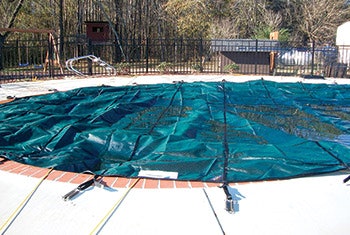 Proper layout and placement helps ensure proper cover performance over the winter, ease of installation and cover durability.
Positioning is key to making sure the safety cover not only fits perfectly, but also has straight straps and no wrinkles. If you don't have the cover laid out properly, you will find yourself adjusting straps to remove wrinkles, resulting in crooked straps — and most homeowners, whether they tell you or not, hate the look of a crooked strap.
Before drilling any anchor holes in the deck, you should always lay the cover over the pool to position it correctly. Some installers use sandbags to hold the cover in place, while others use cinder blocks. (If you're using cinder blocks, place something on the cover to protect it from damage.)
When positioning the safety cover, start with the critical parts around obstacles such as slides, diving boards and stairs. Make sure all cutouts are lined up perfectly, and then adjust around the perimeter of the pool. Some installers use a rope "spider web" technique to ensure proper placement. By tethering ropes across the entire width and length of the pool and placing the cover on top, you can keep the cover out of the water and thus make adjustments much easier. Each of the spider web ropes are anchored with rebar stakes or tied off to surrounding fence posts. Once the cover is positioned correctly, you can drill the first hole.
Many installers follow the pool's perimeter when drilling; however, some like to drill the anchor points counter to one another, alternating side to side. This crisscrossing technique allows installers to adjust as they go, ensuring a smoother, better fit, without any puckers.
When drilling anchor points, keep in mind they should not be placed into concrete joints, where chipping can occur, and not too close to the edge of the deck, as a hammer drill can break the deck. Also, it can be helpful to use a guide to ensure the drill bit doesn't bounce around and possibly chip the deck. This is especially true with stamped concrete decks. A guide can be created with a simple chunk of 2-by-4 with a 3⁄4-inch hole drilled through the board. Use the hole as the guide for the drill.
Also keep in mind that design elements around the pool — like raised spas, waterfall walls or raised bond beams — often require the safety cover to be secured directly to the feature. To do this, installers need to drill directly into the feature's wall and use a cable-fastening system, which can sometimes be a challenge and take additional time.
Always plan accordingly based on the presence of these types of features.
2) Don't skimp on eyebolts:
 Working with vertical surfaces of raised bond beams, walls and associated water features means installers sometimes need to don hip waders to install cover anchors.
No professional wants to install more anchors into a feature than necessary, but there should be enough to ensure the cable pulls the cover up flush and tight. A common mistake is not using enough eyebolts (cable anchors), especially around features with a radius. For this anchoring method, cables are threaded through the eyebolts and pulled tight to secure the cover against the feature.
If too few fasteners are used, the cover will bunch up around the feature and cause puckers and gaps where debris can enter. In worst-case scenarios, the safety of the cover may be compromised.
Drilling into vertical wall features can be another installation challenge. In most cases, if it is a straight vertical wall, there is no need to use a cable anchoring system, as clips underneath the cover can be fastened directly into eyebolts on the wall.
When the feature is only 1 1/2-to-2-feet tall, you can oftentimes hang the cover over the wall. If the feature is taller or harder to access, however, installers might find themselves entering the pool in waders, using battery drills to install anchor points. Installers sometimes even find themselves in small inflatable boats drilling around coves and grottos.
3) Protect the cover:
Experienced installers know covers can be whipped by the wind throughout winter. Even minor, regular rubbing against decorative rockwork, bullnose coping or other pool features can cause a safety cover to tear or fail prematurely in the spot where abrasion takes place.
Installers will sometimes use long pieces of carpet (or similar padding) in these rough areas to protect the cover from abrasion. Manufacturers offer clip-on padding — rubber pieces that clip directly to the cover and can be placed directly over the rough area of concern — to ensure the cover lasts for many seasons.
4) Working with short decks:
 Some winter covers don't use anchors at all, such as this cover from Fox Pools that relies on beads and tracks to hold the cover in place.
This is one of the biggest challenges winter cover installers face. With backyards getting smaller, installers are confronted with narrow decks that are 12-to-15 feet wide or less. To compensate, D-rings can be installed on the cover straps on the deck's narrow side; however, this makes placement even more critical, as the regular compression safety cover springs on the opposite side of the pool are forced to ensure a tight fit.
There is also a new patent-pending process called "spring over cover," which involves having the anchor sit just 2-inches away on the deck but uses a D ring along the top of the cover. This process is ASTM approved so the cover remains as safe as possible. This is an excellent new option for installers working with short decks around pools.
5) Tight, but right:
 Creative designs for pools and their surrounding areas means installers sometimes need be creative as well as flexible during the installation process.
It is important that the cover's fastening springs are neither fully-compressed or under-compressed. If pulled too tight, the springs are not able to expand and contract with the elements, such as additional weight from snow loads and ice. If they are not tight enough, however, safety can be compromised, as it may allow children or pets to get under the cover.
Following these simple measures — and of course all manufacturer instructions to a tee — will ensure a smoother cover installation, easier removal of the cover when the weather warms up again and a pool in better condition when it comes time to get the water ready for swimming. On the other hand, cut corners on cover installation and you may find that when it's time to pull the cover off the pool, nature has had its way with both and left an unpleasant surprise or two behind.
* Tips courtesy of Gary Tripp, president of Tripp Construction, Raymore, Mo.; and Eric Gohn, vice president of sales, Fox Pool Corporation, York, Pa.


