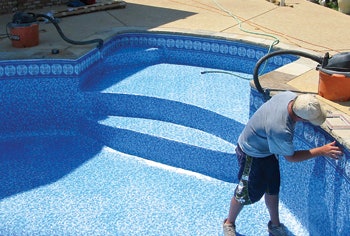
Years ago, there were clear boundaries in the pool-building business. Custom pools were built by gunite guys, fiberglass pools went in quickly and suited customers who didn’t mind limited choices, and vinyl liner installers sort of had one foot in each camp — the pools they built weren’t cookie-cutter, but they weren’t exactly custom either.
Those distinctions have been blurred, as vinyl liner installers have incorporated more-sophisticated elements into their pool designs and now get face time with prospects that at one time wouldn’t have given them a glance.
Now, it’s one thing for a vinyl builder to draw up plans for a pool with radiused steps, a tanning ledge and a waterfall, and quite another thing to get the liner to fit the thing properly. This can be especially intimidating for those new to the process.
Here are some "best practices" for measuring and installing that should lessen your apprehension about adding special features to your customers’ vinyl pools this season.
Measuring
Providing perfect measurements to your vinyl liner fabricator is the key to getting a nice, snug fit, and it’s especially important when you’re dealing with a pool that’s got some complexity built in. Each fabricator recommends a slightly different measuring process, but all agree it’s important to be on the same page from the get-go.
"The key for us is to discuss with the dealers what it is we’ll be looking for before they go out and measure," says T.J. Moreland, business development manager for Merlin Industries. "The don’t want to go out and measure it one way, then discover they should have been doing it another way."
The first step is to gather up some measuring supplies. A measuring kit should include cloth and steel measuring tape, a plumb bob, rebar or aluminum stakes, a level, duct tape, chalk, 1⁄8-inch closed-cell wall foam and a digital camera, which allows fabricators to see the pool you’re working on and helps prevent expensive mistakes like liners being made backwards.
Steve Keller, construction manager for All Poolside Services, St. Paul, Minn., also likes to bring along VynAll’s Out & Down measuring tool, which he says is very useful for measurements on stairs, benches, sloping walls and other more-difficult features.
"Measure, measure, measure," is the advice of Ken Corallo of Seahorse Pools in Fort Worth, Texas. "We have more reference points than the liner fabricator requires, and I always check my measurements several times."
Vinyl-liner pools may have advanced in recent years, but they’re still measured the old-fashioned way with A-B plotting. Fabricators have measuring forms with blanks for recording length and width, distances between two points and closely spaced points along the edge of the pool, as well as depths, wall slope, etc. It’s a decidedly low-tech approach, and one that rewards the patience and attention to detail Corallo and those like him show. Fabricators have professionals in the field that can help the uninitiated with this crucial step.
Shrink Factor
Measuring a vinyl liner for a proper fit is difficult enough, vinyl fabricators say, without trying to factor in weather and the weight of the water. They all recommend installers leave those calculations to the professionals in the factory.
"Every manufacturer has their own way of doing things, but one thing we all have in common is we do take the dimensions from the dealer and work in a shrink factor," Moreland says. "Really, the last thing we want is for a dealer to already figure some shrink into a liner, and then have us to the same thing. Now you’ve really got too much stretch figured into it.
"So we’re always looking for the on-site dimensions. We’ll make the modifications based on time of year, weather, the pattern color — will it collect sun and stretch more? — things like that."
LOOP-LOC’s assistant sales manager Bill Hanley says his company offers three options for liner fit, and lets the installer make the decision based on what he or she is comfortable with.
"We have the full fit, which is more for winter months, a standard fit, and we have a snug fit, which is for the hotter months," he explains. "Depending on where you’re installing, the liner sometimes determines the fit option you will choose. Down south, for example, it’s hotter longer, so they’re more likely to always request a snug fit. We allow our dealers to choose the fit that is best for them and the conditions of their install area."
Should an inexperienced builder request, say, a snug fit for a May install in Massachusetts, LOOP-LOC would gently steer the customer into getting a standard fit and seeing how it goes.
"If they [still] want to go with a snug fit, they certainly can," Hanley says. "Installers know what they like, and each has his own way of doing things. We want to make liners custom for what the installer likes." This system not only takes the guesswork out of the hands of the measurer, it puts important decisions into the hand of professional vinyl fabricators who make them daily.
Dangerous Curves
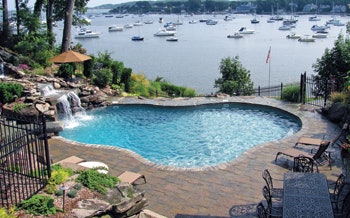
As much as vinyl installers try to push the boundaries of the material’s usage, there are some cases where it’s best to temper designs to accommodate vinyl’s limitations. While no fabricator would come out and say they can’t do a tight radius on a set of steps, for example, they’ll all suggest a wider sweep makes things a bit easier on everyone.
VynAll and Plastimayd come right out and tell designers to avoid the practice, citing the problem of puckering on steps where the riser meets the tread, especially near the surface of the water. They’ll cut the patterns if that’s what’s specified, but not without a word of caution.
LOOP-LOC tends to be more liberal in this area, and has even created a machine for seaming tight corners, according to Hanley.
Tight curves and corners can also cause headaches for the installer when he’s preparing the measurements. Often times, the installer will create a template of the area and send that to the factory in addition to the measurement to guard against mistakes.
Corallo does this, with VynAll’s blessing. Not all fabricators subscribe to the principle, though.
"It’s not something we really prefer or recommend at Merlin," says Moreland. "But you’re going to have dealers that do it that way, and that’s OK. We can work with them. The problem with template, though, is it’s very difficult on the manufacturing end to recreate the template."
The problem arises when the template arrives at the factory. Taped-together pieces of foam could fit perfectly over a sun shelf or set of steps, but workers at the factory don’t have the actual shelf or steps to lay the template on. In addition, even if a template is perfectly rendered, the fabricator is going to have to check it against the measurements the installer sent. What if they’re not the same? Which is correct?
Some dealers doing vinyl renovations will even cut the vinyl that covered a certain section and send that into the factory for measurement. This creates a similar problem because of the lack of something to lay that over. The section is also fundamentally changed once it’s not subject to any water pressure. The material shrinks, leaving what’s meant to be an accurate guide for the fabricator a shrunken and puckered problem.
Moreland says there’s a better way: "Instead of using a template, you can use A-B measuring and a plumb bob. It’s possible to plot points at different levels and record those points along with the riser and tread dimensions for steps and cuddle coves. That’s the way we train and the way we like to do it. The template can create more problems than it’s worth."
That said, Moreland stresses that like fabricators, each installer does things a little differently. Ones who like using templates are easy enough to work with when the measurements match the deconstructed and reconstructed templates.
On The Right Track
Once you have the liner in hand, there are many ways to ensure you install properly. Always start clipping the liner into the most complex part of the pool — whether that be the sun ledge, bench or steps, according to J. Kevin Shea, senior vice president and chief marketing officer for Plastimayd, which owns VynAll, a company he founded. If you have challenging areas on opposite sides of the pool, start with those first and work the liner around the pool perimeter on either side of the special features.
Corallo says he always starts at the most difficult section of the pool and uses sand bags to hold the liner in place, especially complex steps. Keller agrees. He lays down foam on the vinyl and then puts a sand bag on top of the foam for extra protection. "I find this especially important when I have a cuddle cove in the deep end that will want to slip out of place while I’m working on a step section or sun ledge in the shallow end," he explains.
Both Keller and Corallo use rod pockets behind the liner in the step section to ensure a tight fit. Liners with rod pockets need to be requested when you turn the measurements into the fabricator. They’ll then weld a pocket or sleeve onto the back of the liner, through which the installer will slip a fiberglass rod and clips to hold the vinyl to the step.
"In the Dallas area we have a lot of ground water and a torrential rain can cause a liner to float," Corallo says, "and the steps or sun ledge is the first to rise. Using rods with pockets prevents this from happening."
Keller, on the other hand, prefers using a bead track system: "You just snap in to the specialty feature, like full pool width steps, in the same way the perimeter of the liner snaps in to the track," he says. "It’s easy and looks great."
When installing the bead into the bead track, take into consideration hot or cool temperatures. Shea teaches installers to be mindful not to stretch the bead in hot weather, but to push the hands in the direction of one another instead of opposite directions, to keep the bead from stretching. Doing this prevents the installer from winding up with too much perimeter once he’s snapped the bead into the track.
"In cold weather you want to do the opposite and anticipate that you do not have enough perimeter because the liner is cold," he says. "So as you are holding and snapping the bead in, you should grab and pull in opposite directions to literally try to stretch the bead to create a little extra perimeter. It is a very subtle technique."
Vacuuming Out The Air, Adding The Water
Once the liner is positioned properly, double check to make sure the wall is aligned with the floor by looking for diagonal wrinkles. After making adjustments, you’re ready for the vacuums. With this task, selecting the proper number of pumps is the first order of business.
As a general rule, the bigger the pool, the more vacuums you want to use.
"On a smaller pool, one vacuum could work, but we recommend going with at least two," says LOOP-LOC’s Hanley. "You want to keep those vacuums running while filling the pool with water."
Pools with added amenities and special needs need special attention at this stage, and stricter attention to details is important, according to Shea.
"If you are putting in a lot of fancy features, you are definitely going to want more than one vac to help set the liner," Shea says. "Next, position your vacuum so that it is located centrally whenever possible, whether you are feeding it through the mouth of the skimmer, down behind the liner, and/or directly down the wall, behind the bead section."
A best-practice method is to place the vacs in the skimmer areas, according to Hanely, though he again points out installers each have their own ways of doing things.
Once a liner is pulled down tight against the wall, you know you’ve gotten a proper seal. Any looseness is a sign and air is escaping somewhere. Troubleshoot these areas, and iron out any remaining wrinkles, before adding the water.
"Procedures should be followed when putting the water in the pool," says Hanley. "You should always put the water in from the shallow end and let it run to the deep end, because if you put too much too fast into the deep end, it could pull away from other spots and cause fit issues.
"And you want to make sure the water reaches about 5 inches in the shallow end before removing your vacuums."
Now, with the corners carefully placed, the air sucked out from behind the liner, all wrinkles smoothed and the water added, it’s possible you’ll still find some puckers. There’s no magic formula for these final fixes. Some guys use plungers to pull on the material, other guys get in there and work problem areas to the walls with their bare hands.
If you’ve measured correctly and taken special care to place the liner properly, these problems shouldn’t often arise.
Comments or thoughts on this article? Please e-mail [email protected].


