


This is the second entry in our two-part series about skimmer replacement. To see Part 1, click here.
Last month we looked at the first steps in the skimmer replacement process. That included assessing the damage, planning the work and discussing a range of possible issues that could impact the scope of work with the client. Then we got down to business removing the decking material from above the skimmer box, evacuating all the leak-compromised gunite from the area around the skimmer and taking out the old skimmer itself.
With the old skimmer removed, the skimmer box free of debris/spoils and the incompetent gunite gone, it's time for part two of the process: installing the new skimmer along with new structural steel and concrete in the skimmer box.
As I mentioned last month, this is usually he second half of a two-day process, although I typically tell the client that the water level will be lowered and the pool will be non-operational for up to five days to allow for scheduling and unexpected problems that may arise.
RELATED: Skimmer Replacement, Part 1
PREPPING FOR STEEL
We get back to work by getting ready for the new steel reinforcement. The basic idea is that the steel and concrete form a monolithic structure that is properly supported and tied to the pool shell. In effect, the skimmer itself becomes a functional form within the concrete.
Because it's easier to drill holes without the skimmer in place, I do this step before we install the new skimmer. The first step is to drill a set of holes in the pool structure to accept epoxy and the new steel. These holes will be located at the back of the bond beam and the pool wall. The upper holes are located 3-6 inches down from the top of the beam and 4-6 inches to either side of the skimmer opening. Then I create a second set 14-16 inches down in the same orientation to the skimmer.
NOTE: If a skimmer is being replaced because of a pre-detected plumbing leak, it's important to conduct a follow-up pressure test after all of the skimmer's plumbing have been exposed. Sometimes it's obvious where the fracture is located, other times it will require a pressure test to cause the leak to present itself. Following the skimmer's plumbing installation, you will need to re-pressurize the line in order to ensure the integrity of your work.
 On this project, we retained the old steel in conjunction with the new rebar for added strength.
I always use #4 steel, preferably grade 40. It's much easier to bend than grade 60, which is very rigid and commonly used in foundations. To properly accommodate the steel size, the holes I drill will be 5/8-inch in diameter, drilled at a 45-degree downward angle with my roto-hammer. Each hole will be 6-8 inches deep. On occasion you'll find yourself encountering existing steel. In that event, I choose a new location for the hole, typically diagonal down and over, approximately 1 inch.
I bend the 5-foot piece of steel to create a U that encases the skimmer and fits neatly into the holes on each side. I find the center of the rod by balancing it on my finger, and start working evenly outward from the center, alternating both directions until I create a U shape where the ends will align with the holes.
Using compressed air (or if unavailable, a heavy-duty plunger device), along with wire brushes made for cleaning out drilled holes, you need to properly clean and blow out the holes prior to putting the new steel in place. I blow it out with the air, put in the brush and twist it to remove any loose material on the sides and then blow it out again. You do not want to put epoxy into a dusty hole because you run the risk of not getting a good bond.
Here's a trick I learned: Cut off the loop end of the brush and put it in a cordless drill chuck. It makes the process easier and faster.
Remember, cleaning the holes is very important. And it only takes a couple of minutes.
RELATED: What's Under the Vinyl?
 When installing the new steel reinforcement, you must maintain the bonding/electrical continuity with the existing structural steel, meaning the new steel must be connected with approved direct-burial bond clamps and #8 bare copper wire.
CONNECTING THE NEW SKIMMER
Now it's time to plumb the new skimmer. You start at the equalizer line, assuming you have one because that's your rigid and fixed point. I sometimes find the line is not plumb or level. If that's the case, you may have the opportunity to re-plumb it so it is perfectly level and straight up and down, making the connection better than it was before.
Sometimes in my demo and prep process, I'll make enough space to create a short section of pipe that you can manipulate to connect the equalizer line to the new skimmer. Sometimes you can do this by using an additional fitting or combination of fittings to bring the line into plumb.
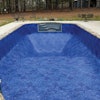
 Here, the skimmer was being replaced as the result of inordinate deck movement and a previous fracture of the old skimmer body. I used the expansion joint/separation detail to ensure that never happens again.
 In this application I obtained the color spec for the coping to match the new deck over the skimmer. We chose to use the soft-sand finish as the coping surface rather than trying to match the freeform, textured stamp of the existing deck. We used the same texture on the skimmer lid to tie it all together.
If that's not possible, take that section of pipe and use a heat gun (Milwaukee makes a high-end durable gun) to gently heat the pipe without burning. Using a heat gun is much more conservative and easier to control than using a torch to heat the pipe. You simply run it up and down the pipe, making sure not to heat up the ends where you're making the plumbing interfaces. (You don't want to heat up the ends because that will distort them and won't allow you to make a proper plumbing connection.) Slowly move the heat gun up and down the length of pipe until it's pliable enough to gently bend into position. At this point you'll be able to use water from a trigger sprayer or sponge to cool the pipe and lock it into proper alignment.
Now you have a perfectly plumbed connection without compromising the pipe once the skimmer is set in place.
From there you go about figuring out how to make the final connection: the suction line from the pump. That can be difficult to describe in a magazine article because, as anyone who's done PVC connections knows, there are generally hinge points and some movement to the pipe that you can use in the process of plumbing the pipe into place.
(Frankly, if you don't know how to adjust plumbing and make these basic connections, you probably aren't ready for a skimmer replacement project.)
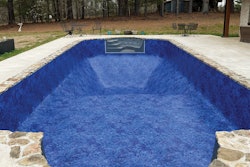
 This aggregate surface was approximately 25 to 30 years old when we replaced the skimmer. Finding aggregate to match all those years later was no small order, but we managed to come close using a custom blend. This picture was taken about a year after the skimmer was replaced and is an example of why we use mastic seal expansion joints in projects where I anticipate the deck will move. Looking closely at the mastic you can see how it has been impinged by the deck movement.
FINAL STEPS
Now with the skimmer set, epoxy the steel into place around the new skimmer. We use Simpson Strong-Tie epoxy or its equivalent with its special application gun with its injection nozzle, carefully following the instructions for the two-cartridge epoxy process. You start at the bottom of the hole, injecting the epoxy as you back out, ensuring the hole is properly filled.
Then I insert the new steel into the hole — wiggling it helps move it into place. If the hole isn't perfectly aligned, I sometimes use a sledge to tap the steel into place, striking it at the back of the loop. As mentioned above, we've drilled the holes at 45 degrees, so once installed, we bend the steel to a level position or slightly lower, which helps create a mechanical bond between the steel and gunite, as well as the chemical bond from the epoxy.
At the interface between the new skimmer and the back of the skimmer throat, we make up plaster packing using white cement and plaster sand to pack the throat from the backside. As the material begins to set, you can carve out any excess on the inside of the skimmer throat, leaving adequate room for matching tile grout. This will more than adequately seal the joint, assuming the skimmer is locked into place with the steel and new concrete.
Now it's time to replace the concrete in the skimmer box. Here you can do one of two things. My preferred method is to mix up 5,000-psi high early-strength concrete. Most jobs take anywhere from 10 to 20 sacks. We'll mix them in a five-gallon bucket, augmenting each batch with one D.E. scoop of gray cement (approximately four cups.)
Mix it to a consistency where it's not too dry, but liquid enough so that it forms easily around the new skimmer, plumbing and steel.
RELATED: Is Fiber-Reinforced Concrete the Material of the Future?
The other way we have completed this phase is by using portable roto-mixers and ready-mix concrete. It's effective when you need to use larger amounts of concrete because it saves you the labor of doing it in a bucket, but you do have the logistics of renting a mixer to consider.
The final decking finish surface should be discussed with the client in advance. Your next move depends on the type of surface desired and your skill set. You may or may not need to bring in a concrete finisher or mason to complete this phase. In some applications, depending on the expected movement of the deck, I will install a mastic-sealed expansion joint, separating the new skimmer concrete from the existing deck in order to protect both.
With the decking finish surface completed, you are done!