


Repairing structural cracks can be extremely problematic, says veteran builder Steve Swanson, especially if you don't first determine their cause. Using a recent project as an example, Swanson demonstrates how initial appearances can be deceiving.
When cracks in pools happen, there's almost always an identifiable reason. They typically occur in places where there's stress on the pool shell and/or substandard construction. We find them emanating from skimmers, corners and depth transitions, all places where there's greater stress and potentially weaker spots in the structure.
Determining the cause and a subsequent fix can require a bit of detective work. By observing a crack's location along with the degrees of its visible opening and length, we can make educated guesses as to the root cause — but those surface evaluations can be deceiving. Often times, what looks like an insignificant surface crack — the kind that might occur during initial hydration of the gunite/shotcrete — will turn out to be far more serious.
The problem is you can't know for sure unless you open up the impacted area and take a direct look beneath the surface. If you skip the investigation and opt for an epoxy injection repair, for example, you very likely are not addressing the root of the problem. While a technique such as epoxy injection might be suitable for some applications, in a great many situations you need to more fully understand the pathology of the crack before you can implement a reliable fix.
The causes can be flaws in workmanship, such as inadequate gunite/shotcrete coverage over structural steel, or the steel's necessary clearance from earth. It can be the use of rebound around the skimmer, or even something as simple as failing to remove duck tape around a skimmer (after gunite and before tile installation), a surprisingly common misstep I've seen numerous times over the years.
When those problems are located at stress points in the structure and especially if they're also subject to hydrostatic pressure, i.e. groundwater, then you have a prescription for cracking and leaking.
The project pictured here involved a crack that had become "active" most likely during the first year or two after initial construction. When I came on the scene, called in because the pool was leaking badly, I could tell the skimmer adjacent to the crack had already been replaced – likely resulting from one of the causes mentioned above.
Here's what I found:
 1. To the untrained eye this crack, which had been covered over with epoxy putty, doesn't look like much. I begin to open up the crack, removing the material starting directly on the fissure itself. When we dig deeper and look below the pebbles and the original green plaster below it (the pool had obviously been remodeled) we can already begin to see how the crack is far more extensive. Note the epoxy injection point still visible. - Click to enlarge
 2. As we remove more leak-compromised material and go deeper, we can see that the crack transmits all the way through the shell, causing the leak. The area around the crack is compromised as well. (Photos by Steve Swanson) - Click to enlarge
%{[ data-embed-type="image" data-embed-id="615602a1da0164822331227b" data-embed-element="span" data-embed-align="right" data-embed-alt="3. Here we can see water's damaging effect as it opportunistically moves through the crack in the structure and is absorbed by the gunite, compromising integrity and corroding structural steel along the way. Speaking of opportunism, an ambitious earthworm found its way through the crack deep into the pool shell. It's not unusual to find worms and especially invasive roots in cracks of this severity. There's a popular misconception that roots are a common cause of cracks of this severity, when in fact they're much more likely seeking an available water source after the crack has already formed. Here just above the worm, we can see where the water that's so inviting to subterranean flora and fauna has eaten all the way through the structural steel, evidence that this crack has been leaking for a long, long time. In these types of situations, I find it remarkable how narrow the impacted area can be relative to the damage it causes - in this case severing the steel, all within a half- inch margin. - Click to enlarge" data-embed-src="https://img.aquamagazine.com/files/base/abmedia/all/image/2015/07/aqua.OOT-OOU_715-AQ_sm.png?auto=format%2Ccompress&fit=max&w=1280&q=70" data-embed-caption="3. Here we can see water's damaging effect as it opportunistically moves through the crack in the structure and is absorbed by the gunite, compromising integrity and corroding structural steel along the way. Speaking of opportunism, an ambitious earthworm found its way through the crack deep into the pool shell. It's not unusual to find worms and especially invasive roots in cracks of this severity. <br>There's a popular misconception that roots are a common cause of cracks of this severity, when in fact they're much more likely seeking an available water source after the crack has already formed. Here just above the worm, we can see where the water that's so inviting to subterranean flora and fauna has eaten all the way through the structural steel, evidence that this crack has been leaking for a long, long time. In these types of situations, I find it remarkable how narrow the impacted area can be relative to the damage it causes - in this case severing the steel, all within a half- inch margin. - Click to enlarge" data-embed-width="640" data-embed-height="320" ]}%
 4. As my first day on this repair draws to a close, the affected area is now entirely open with all of the bad material removed. What started out looking like a minor surface crack has in fact impacted a surprisingly large area.
Now it's time for the second phase of the process - the repair itself. - Click to enlarge
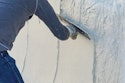
 The first step in this repair process involves 'stitching' the structure with new rebar staples in order to re-establish structural integrity. Here we can see the holes I've drilled where I'll anchor the new steel in epoxy. It's crucial to locate these anchor positions in solid, competent material. Also, whenever possible, I try to position the staples so that they anchor behind an adjacent piece of vertical steel. This not only locks the sound gunite but also buttresses the structural steel itself.
Attaching them in substandard material is useless. Once we've located and drilled the holes, it's equally important to make sure they're free of debris, which is why I blow them out using compressed air, followed by two passes with a wire brush and a final blowout cleaning. - Click to enlarge
%{[ data-embed-type="image" data-embed-id="615602a1da016482233122fb" data-embed-element="span" data-embed-align="right" data-embed-alt="Here I 'dry-fit' the rebar staples into place. In terms of the staples themselves, they can either be fabricated on site or prefabricated to your specifications by a steel fabricator. The point being, you drill the holes in the desired locations to accommodate the specific dimensions of staples, rather than trying to bend the steel to fit in the holes. Once permanently epoxied in position, it's time to fill in the void with new concrete. For these types of repairs I use a hybrid mix of 5,000-psi early strength concrete combined with professional-grade mortar, fiber mesh reinforcement, gray common cement and a non-chloride setting agent. I customize the mix design based on a number of variables based the specifics of each project. I mix the material so it has the consistency of chunky peanut butter; viscous enough so it's easily workable but still compactible, meaning the material can be worked into all the nooks and crannies while staying stiff enough to stay in place. Just prior to the application of my hybrid material, I apply a latex-based thinset to the surfaces that are going to receive the new material. The thinset acts as a bonding agent with the new concrete. It's important to apply the hybrid material before the thinset dries or skins over, usually within a matter of just a few minutes, depending on site conditions. Once complete, the patch is now ready for resurfacing. As night falls I leave satisfied knowing that my two days of labor I have corrected a problem that was very likely a decade in the making. - Click to enlarge" data-embed-src="https://img.aquamagazine.com/files/base/abmedia/all/image/2015/07/aqua.OAA-OBB_715-AQ_sm.png?auto=format%2Ccompress&fit=max&w=1280&q=70" data-embed-caption="Here I 'dry-fit' the rebar staples into place. In terms of the staples themselves, they can either be fabricated on site or prefabricated to your specifications by a steel fabricator. The point being, you drill the holes in the desired locations to accommodate the specific dimensions of staples, rather than trying to bend the steel to fit in the holes. <br>Once permanently epoxied in position, it's time to fill in the void with new concrete. For these types of repairs I use a hybrid mix of 5,000-psi early strength concrete combined with professional-grade mortar, fiber mesh reinforcement, gray common cement and a non-chloride setting agent. I customize the mix design based on a number of variables based the specifics of each project. I mix the material so it has the consistency of chunky peanut butter; viscous enough so it's easily workable but still compactible, meaning the material can be worked into all the nooks and crannies while staying stiff enough to stay in place. Just prior to the application of my hybrid material, I apply a latex-based thinset to the surfaces that are going to receive the new material. The thinset acts as a bonding agent with the new concrete. It's important to apply the hybrid material before the thinset dries or skins over, usually within a matter of just a few minutes, depending on site conditions. Once complete, the patch is now ready for resurfacing. As night falls I leave satisfied knowing that my two days of labor I have corrected a problem that was very likely a decade in the making. - Click to enlarge" data-embed-width="640" data-embed-height="236" ]}%
Postscript: In this situation, the clients are planning a full-scale remodel this fall, which I will ultimately do. We agreed it made sense to perform this crack treatment as an initial phase in order to confirm that any site conditions surrounding the repair wouldn't have further bearing on the structure.
Comments or thoughts on this article? Please e-mail [email protected].