


It's arguable that installing package pools is simpler than gunite vessels, but there are still numerous steps that have to be done correctly in order to create enduring installations. As with any structure that is meant to hold water reliably and indefinitely, you have to hit certain marks of quality to maximize the value of your customers' investment.
I've been installing, renovating and repairing package pools, i.e. those with vinyl liners, for 28 years — and over that time have embraced a number of steps and measures that make a huge difference in the overall performance of the pool, which in turn results in happy pool owners.
SOILS

With gunite pools, there's a general understanding that the soils conditions have a huge impact on the structural design and installation. There's a tendency to think that with package pools, the soil conditions are somehow less relevant. What I've found, however, is that when installing a package pool system, the ground condition has a huge impact.
Say, for example, you're working in uncompacted fill. You don't want to place your footers directly into unreliable material because it's going to settle and sink, which can cause a range of problems from wrinkles in the liner to failure of the walls themselves. Vinyl liner floors are especially susceptible to damage.
RELATED: Beautiful Package Pool Design
You still want to stick with the same practice of digging down into competent soil. That becomes more complicated when you have to add compacted gravel to support the floor and the walls. While necessary in some situations, it can also allow water migration beneath the floor that can in turn lead to buckling and liner displacement, especially if the pool is fully or partially drained at some point for some reason. Groundwater can also compromise footings and create pressure on the walls.

In those situations, we'll install a French drain attached to a culvert with a cover that can allow either a permanently installed sump pump, or a place where you can check the water level and lower a pump prior to draining. Like any other type of pool, concrete, fiberglass or stainless steel, groundwater intrusion can cause problems.
Also, it's common practice among many installers to set the walls directly on the ground. I've found that can also lead to trouble, especially with steel walls, as some types of soils can be corrosive and over time eat away at the bottom of the walls. That's why I set our walls on 4-by-8-inch cinder blocks to provide a non-corrosive base.
Raising the wall just an inch off the soil is a simple measure, but one that can prevent structural failures or settlement down the line. I've had soils conditions so bad that we poured a 3-inch sidewalk-type of slab, then bolted the walls to it and then poured our footer behind the walls.
FOOTERS

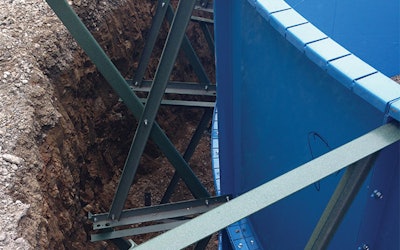
Package pool walls always need footers around the outside behind the wall panels. The concrete is reinforced by the X-braces and typically does not need much in the way of structural steel. The walls themselves, when bolted together, create the support.
We do wrap a single 3/8ths-inch bar all the way around the X-braces to help hold everything together, but that's not really structural support per se. Keep in mind that the weight in a vinyl liner pool is pushed outward, and manufacturers do a good job of designing wall systems that withstand the pressure.
Our footers are typically 24 inches wide and 10 inches thick. We use a 3,500-psi mix with fiber reinforcement. The idea is to both lock in the wall structure and prevent groundwater from impacting the walls.
FLOORS
Having a smooth floor is absolutely critical to the longevity of the liner, which is why we go to the expense of using only vermiculite floors instead of the cheaper sand and concrete — or just sand, as was common practice many years ago.
Vermiculite is a type of rock that is baked and crushed to various consistencies, then mixed with Portland cement. We use a #2 coarse material that is the standard for the nursery industry. We mix 94 pounds of Portland cement, one pound of lime and six cubic yards of vermiculite in a large mortar mixer — nine-cubic feet or bigger —with about 15 to20 gallons of water per batch.
Vermiculite takes a long time to mix with the water and cement, so the longer you mix it the better — at least 15-to-20 minutes. It needs to reach a creamy consistency for workability.
I'm not a huge fan of pre-mixed vermiculate because manufacturers tend to use fines, which is difficult to trowel to a smooth finish.
RELATED: The Wide World of Custom Package Pools
Even using our own mix design, vermiculite is an extremely difficult material to install properly. It's basically like troweling wet oatmeal. Every now and then we'll pull up a liner installed by others, sometimes even homeowners themselves, and the vermiculite is horrific, with footprints still in the material as well as all sorts of rough patches and cracks.
You have to know what you're doing to get it right. Years ago when I first started working with it, I was known to throw a trowel or two in frustration. But over the years I'm proud to say I've mastered it, although it did take time.
Before you install vermiculite, it's important to get the soil substrate perfectly smooth and shaped. We run string lines over the excavated ground to get the levels and contours perfect, and then we add a layer of river sand that we wet and trowel into place. Then we trowel the vermiculite an inch and a half thick.
When first troweling, you want to leave vermiculite really rough and then let it lose some of its moisture. Then, when it's hardened a little, go back and smooth the finish using a lot of pressure with the trowel. If you do the finish pass too soon, it blisters. Wait too long, and it becomes almost unworkable.
(It's important to note that you shouldn't use vermiculite over gravel because if you get even just one piece of gravel sticking out above the surface, it will damage the liner as it expands and contracts.)
Liners will expand and contract through the life of the pool. Vermiculite doesn't have any aggregate and is very smooth, so it allows the liner to move over the floor without damage. When you get it right, vermiculite provides a durable and smooth floor that works to prevent wrinkles and leaks over time. It also feels better on your feet.
LINERS
Whenever possible, I try to install the liner the very next day after the vermiculite is in place. At that point, it's hard enough that it doesn't leave a footprint, but soft enough for any additional smoothing. Some contractors I know try to drop the liner on the same day as the vermiculite. The problem with that is it's still so wet that some of the material will be permanently stuck to the liner, which can prevent the liner from moving over the vermiculite as necessary. This in turn can lead to wrinkles.
If you wait two days, however, the vermiculite will dry out and crack, which can also lead to liner damage — this can become an issue if the liner doesn't fit and you have to send it back to the manufacturer. In those rare situations, we'll put water on the vermiculite and cover and seal it up with visqueen.
One of the most important steps is to make sure you get the liner sucked down onto the floor and the walls so that it looks like a paint job. I've seen some people run the vacuum hose out through the skimmer outlet and down the liner — but the key here is to run the hose all the way down to the bottom of the wall where it meets the vermiculite. That's where there will be a small gap that enables you to get the suction needed to get the liner squared up and smooth.
Sometimes you have to try it in more than one spot. In bigger pools, you may need to use two vacuums, typically one on each end.
If you get it sucked down tight, you can go right ahead and cut in all the fittings. If not, then you have to cut in the main drains and partially fill the pool up to the shallows so the liner is pulled into position. If you cut the fittings in without a tight fit, the liner tends to want to pull away from the fittings, which creates wrinkles and possibly leaks. Plus, it just doesn't look good.
PRACTICE
With the possible exception of working with vermiculite, none of these steps are particularly difficult, but they are necessary if you want to achieve the optimum appearance and performance in a vinyl-liner pool.
As these pools have evolved with multiple patterns and custom shapes, and have become ever more expensive, getting the liner smooth as possible and the structure sturdy have become more and more important.
It can mean the difference between future repairs and frustration — or years of enjoyment!
Comments or thoughts on this article? Please e-mail [email protected].