


 Photos by David Tisherman
The rugged construction described in the first two installments of this series gives way to a host of subtle, carefully planned, aesthetic details. In this final installment, master designer/builder David Tisherman shares in words and images how the finish elements of this spectacular hillside environment come together to create visual harmony and an inviting and functional setting.
One of my favorite analogies is the comparison of great design to a beautiful woman wearing a stylish black dress:
Imagine a classy lady walking into a five-star restaurant or swanky nightclub wearing a simple black dress tastefully clinging to her curves. Her hair is beautifully coiffed perhaps up in a French twist falling over her shoulders. A simple string of pearls adorns her neck; tasteful makeup accentuates her lips, eyes and cheekbones, and a great pair of bad-girl pumps on her feet.
You wouldn’t be looking at the individual pieces of her ensemble; you’d be looking at her. You wouldn’t say, what a great dress, but instead what a beautiful woman. It’s the overall impression, the magnificent sum of the parts that gets to you. It doesn’t require deliberate analysis to enjoy, just an ability to appreciate beauty.
That’s what great design is all about — the impression, the mood, the feeling and ultimately, the invitation. When you walk into a backyard with a pool, you shouldn’t say, what a great pool, or what an excellent deck. Instead, you should simply think, what a beautiful place.
All Dressed Up
That level of subtle integration of elements requires an understanding of design and the foresight to make key aesthetic decisions from the earliest stages of a job. Although most of the aesthetic elements go in last, they should never be last-minute decisions. In fact, quite the contrary; everything you do leading up to the finish work should be designed in support of those final strokes.
This project is a perfect example. It was a job that came with a host of tough challenges — bad soil, no site access and sticky building code requirements — all of which required ingenuity, expense and ultimately extremely rugged construction to overcome.
In our last installment, we left off hydrating the shotcrete shell (not the responsibility of the homeowner) during the all-important curing phase and had saw cut the deck’s existing concrete sub-base to make way for drainage plumbing and conduits for lighting, low-voltage control, irrigation and an outdoor sound system.
Now it’s time for the payoff, the finish elements that will transform the space into a place of artistic integration, soaring ocean views, excitement and gentle repose.
The key in all of this finish work is to create visual balance, nothing overwhelms anything else, everything is in scale and proportion with the other elements and none of it fights with the massiveness of the ocean views and the often brilliant blue sky. It’s all about balance and harmony. Nothing is showy, but instead contributes to a scene of elegance and comfort.
You might say we are putting on the dress, applying the makeup and coiffing the hair.


Tile Lines
This pool is finished with an all-tile custom mosaic blend comprised of Sicis glass tiles, an excellent product imported from Ravenna, Italy, distributed by Cactus Stone of Phoenix, Ariz.
Way back in the planning stages I went through a number of color options with the clients. After a great deal of discussion and consideration they decided on a blend of blues that would go well with the blue of the ocean and sky.
That would not have been my first choice, but it’s what the clients wanted and it’s certainly not a bad way to go in a setting such as this.
As we approached time for the tile installation, I made up a set of sample boards with different grout colors, which have a dramatic effect on the appearance of the surface. I was pleased the clients lit on a medium gray grout color that deepened the overall appearance while still allowing the vibrant colors to pop.
At this point I brought in my tile installation specialist Jimmy Reed of Rocksolid Tile. All-glass tile installations require skill and patience and in my view, Reed is one of the two best installers in the United States, a true artist in his own right.
His first step was to apply a penetrating waterproofing sealer by Aquron. I’m a huge proponent of using waterproofing agents as a form of insurance against even the slightest leaks. The Aquron product was developed by a friend of mine, Jerry Werner, who has a background in forensic failure analysis of massive concrete structures such as seawalls and other critical applications of concrete. Aquron is an excellent product.
Although I build all my pools with 4,500- to 5,000-psi shotcrete, I don’t want to leave anything to chance when it comes to providing watertight structures for my client. We applied the Aquron over the green concrete and then continued with a full installation process including Hydroban by Laticrete (water-proofing and installation materials.)
Only after the float is perfect and all the fittings and shell penetrations properly sealed do we begin installing the tile. Reed strictly follows glass tile installation procedures defined by Laticrete, ensuring a finished product that will stand the test of time. He spends a tremendous amount of time blending the corners and other contours so there is no visual disruption that draws attention.


Art of the Rivulet
During this time, we finished a special detail I developed a dozen years ago known as Tishways (a term coined by Paolo Benedetti) which are visually simple ways of moving water from one level to another. Using Tishways, elegant streams of water take the place of the gushing weirs used in things like raised spas.
We place the float material to the proper height and carefully cut in the notches in the spa dam wall, and then apply the same waterproofing materials and line the slots with a comparable glass tile.
The tiny weirs must cantilever out at least 1/8 to 3/16 of an inch proud of the dam wall. A Tishway is a channel pitched backward so water doesn’t trickle down the face when wind is blowing. Ninety percent of the time this will eliminate the telltale calcium deposit pattern that might form if the water ran down the face of the tile.
A dedicated pump is used in conjunction with the Tishways for two purposes. One is to provide adequate gallons flowing through the channels to create the effect. The second purpose is to act as a cool-down pump if the spa is too hot during operation.
The result is a visually elegant effect that also creates the delicate sound of moving water.

Step by Step
The next issue was creating the stairs that connect the lawn area to the upper deck. The idea was to create soft and gentle radius steps that are cantilevered over the structural armature to give the impression that the stairs are floating over a small reflection pond.
We wanted to achieve an elegant look that didn’t overwhelm the entire space, but added to it by creating interest as you move from one level to another. The pond adds a touch of beauty and sound that makes you slow down and enjoy the experience of the surroundings.
With steps you have to take into consideration the fact that people need to move comfortably and safely. I typically design steps with a 15-inch tread and six-inch risers, which has to be taken into consideration when you’re selecting material. In this case, we worked with a 16-inch modular limestone product called Oxford, quarried in the foothills of Turkey.


Hot Spots
The barbecue area is located on same level as the pool tucked back near the house. It includes a small grill, a 42-inch barbecue, drawers for storage and a large serving counter.
Behind the barbecue we placed a raised fire pit, more accurately a firewall. (Kevin Dowd of Grand Effects provided the electronic ignition natural gas system for all four fire effects on the project.)
Fire features have become extremely popular in recent years and when used correctly they can add a wonderful element to a setting. I believe that fire does not belong directly adjacent to the water; it’s too overwhelming from a visual standpoint because you’re amplifying the effect through the reflection.
The fire becomes a hotspot for the entire site, and your eye can’t move. Designing with fire requires a total understanding of the site, color palette, material and requirements of the consumer.
It’s far more effective as either a complement or a focal point within the landscape or deck areas. Used in this way, you can create separate destinations and invite people to enjoy specific areas you’ve set up to perhaps enjoy the view, dine, have conversations or just a quiet moment.
Designers understand the elements they’re dealing with from a visual perspective as well as an auditory perspective. Fire is extremely powerful and when misused it becomes very contrived.
In addition to the firewall adjacent to the barbecue area, we also used three small fire bowls on pilasters on the steps. The idea there was to draw the viewer’s eye up or down the steps. When the fires aren’t lit the bronze color of the bowls adds subtle color that complements the limestone steps and decks. These bowls contain a custom mix of three shades of amber glass that also add a colorful touch.


Almost Hidden
Many of the details are designed so that you don’t really notice them. For example, the steps leading into the yard: We created a one-inch offset between the bottom riser and the sidewalls so there was a clear demarcation between the plaster and the limestone steps.

More examples include the skimmer lids replaced by pieces of waterproofed limestone that can be lifted to access the skimmer instead of using the familiar ugly plastic. By contrast the deck drains are meant to be little works of art. For years I’ve worked with a company named Iron Age that makes exotic and expensive drain heads. The trick is being able to adapt the size (in this case six-inch drains) so that they look good and work properly. Proportion and scale are most important. Right below the drains, I create eight-inch concrete catch basins finished with a dark oxide.
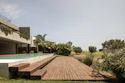
Finally, the massive ramp we built at the beginning of the project for access was dismantled and removed. The area was transformed into a beautifully landscaped corridor that leads visitors toward the environment beyond.
Small Lengths
The clients are avid golfers and wanted to express their love of the game in the landscape, as well as have a place to practice. That’s why below the pool area, we located a putting green, rough and two sand traps. With the beautiful ocean views and luxurious setting, not a bad place to practice!