

A project I completed a couple of years ago illustrates my point. It’s one I’m particularly proud of, and although it’s beautiful in the daytime, the setting is enhanced tremendously by the lighting choices we made.
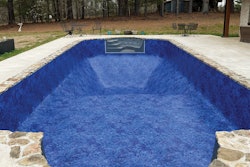
This particular pool occupies an intimate backyard space that harmonizes with the color palette and architectural style of the home. The client came to the process with some good ideas, but had also talked with some pool builders who had him convinced the site needed some kind of vanishing edge. I could see right away that would not maximize the full potential of the setting and I quickly disabused him of the “edge” concept in favor of a design that would be accentuated by the home’s architecture and the towering bamboo plantings surrounding the yard.
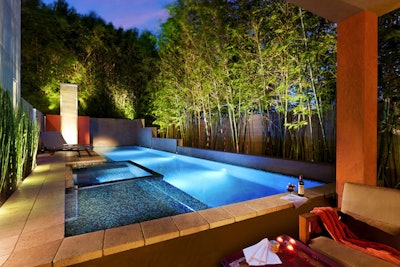
In this case it’s critical to consider how the bamboo draws your eye towards the sky, away from the pool, and how the walls increase the visual impact of the bamboo, which in turn visually intensifies the site with incredible reflections. The dark custom interior finish magnifies those reflections and ultimately ties the project together. There was a reason we didn’t use a perimeter overflow or vanishing edge. It simply didn’t belong on this project.
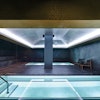
The goal was not to create a beautiful swimming pool, but instead to craft an entire setting that generates an emotional response; where you’re inclined to say or think “what a beautiful place,” not “what a great swimming pool.” As you can see in these images, the lighting has a lot to do with achieving that kind of visual impact.
A key point, perhaps the most important in this discussion: The decisions we made with the lighting systems are a direct extension of the visual elements in the pool. If you don’t understand how lighting will impact the space and you make a mistake, you have to go to great expense and tear out fixtures and start over. It’s an expensive problem. You can’t expect lighting to fix shortcomings or make something ordinary magically look spectacular at night. It’s like putting lipstick on a pig, as the saying goes.

So let’s break it down: At one end of the pool we have a seating area where you take in the entire scene. Along one side of the rectilinear pool there’s a large lounging area, or what I call a thermal shelf, that also serves as a key viewing area. We have a spa adjacent to the thermal shelf, and next to that there’s more decking where you can sit and look over the water. The house and a system of modular wall panels, all with the towering greenery of the bamboo in the background, surround the space. There’s a wonderful water feature in the corner (more on that below), beautiful glass tile on the shelf and spa, and a vivid set of colors that compliment the house.
It’s pretty obvious you don’t put a light in at the opposite end and have it shine up in the main viewing area. If you put the light in the shallow end, however, there would be very little clearance above the floor, which in this situation would show off the imperfections in the plaster surface. (All plaster surfaces have imperfections because they’re trowelled by hand.)
Then there was another option: to place the lights on one side of the wall running down the length of the pool, pointing away from the lounging area, spa and deck. That’s a much better choice in that it would eliminate glare. However, lighting from just one side would create a very unbalanced scene.
COMELY COMPLEXITY
We opted for yet another scheme that adds tremendous visual value to the scene. It’s a situation where adding a subtle layer of visual complexity brings out an entirely new level of visual character. There are four basic areas we focused on: the interior of the pool, the spa, the landscape lighting and the sculptural lighting.
For the pool’s interior, we asked, “Why not have lights on both sides the length of the pool?” That way we could create a design in shadow and light that draws your eye into the water. It’s an approach I like to call “patterning.”
We used lower-wattage fixtures — thus, softer lights — so that when used in concert they create visual lines over the pool’s interior surface. The lights are balanced on three different linear planes, located 24 inches below the water’s surface. The idea was to draw attention to the light rather than simply light the pool. We wanted the light itself to become a dramatic feature.
I think it’s important to always keep in mind that we’re not really lighting the water, we’re actually lighting the opposite wall — the light merely passes through the clear liquid medium.
By creating patterns, we’re able to show off the color and texture of the material in a different way because of the way the light moves from brighter areas to those that receive less light. Here we have three sets of lights facing each other. They meld in the center creating a hotspot. That hot spot is then refracted up down, backwards and forward.
Through this approach, the pool becomes very different at night — the colors of the material, the shape of the pool, the movement of the water and the surrounding elements all take on a different intensity, visual form and illuminated character. It creates an entirely different — and very dramatic — scene.
In this way, the lights are able to create a sense of movement as they meld with each other and ultimately blend with the lit elements outside the pool. Instead of having one big light source that cancels out everything else and basically blinds the viewer, you now have multiple light sources that draw the eye in a number of directions.
 We lit the water veil using “pin lights” mounted at the base to create a very subtle effect lighting the surface of the moving water.
LIGHTENING UP
One thing that has frustrated me over the years is how so many builders don’t ever call in any kind of lighting expert. There are numerous resources and product types available. We have incandescent lights, low-voltage systems, fiber optics and now LEDs, all of which can be used in different ways depending on what you want to achieve. I buy all of my lights from outside the standard industry. My main source is Brian Brzycki of Walter’s Lighting in Culver City, Calif. He’s a distributor and an incredibly intelligent human being. We work carefully together on developing overall lighting schemes.
Also, I sometimes turn to manufacturers with more creative options. Hydrel, for example, offers lights that are square or rectilinear. (I really don’t understand why the industry is hooked on circular lights.) Within each of the various product categories, there might be 25 different options, each with its own characteristics. We deal with issues such as Kelvin ratings, which is a temperature rating that relates to the frequency on the lighting spectrum. If you take a color swatch under different rating lights, the color will appear very different. We need to consider the light output, typically measured in lumens, and the spread of the lighting. And in some cases we need to consider the appearance of the fixture itself, or likewise, how to conceal fixtures, especially in the landscape.
Before you get to that point, however, you have to free yourself from the traditional one-light approach. Why not instead use seven lights down the length of the pool? Why not choose elements in the landscape and hardscape to create visual vignettes by way of lighting? There is no one formula, but instead an endless set of aesthetic possibilities — but you do have to understand what you’re trying to achieve. Simply throwing a bunch of fixtures at a situation will rarely yield great results.
A good example of taking this deliberate approach is in the sculpture. It’s a type of feature known as a water veil, created by a good friend of mine Sean So of Water Studio in Culver City, Calif. Sean is a brilliant guy who creates wonderfully interesting sculptures that feature screens over which very small volumes of water flow, creating an almost hypnotic effect.
 This water feature is known as a water veil, a structure that sends a very subtle flow off water caressing a screen.
When I first became involved with this project, the homeowner made it clear from the start he wanted this sculpture, which he already had in the middle of the yard, to be part of the new design. My initial response was that we had too much going on visually and it would be better to locate the sculpture in the front yard, but he insisted.
Rather than de-emphasize the sculpture, we made it a primary focal point, to the extent that the pool is visually subservient to the sculpture. We located it in the corner of the yard opposite the main seating area. It’s set against one of the modular walls, which in this case is a deep red, which further draws attention. We uplit the front of the sculpture with pin lights, which shows off the delicate flow of water down the face of the feature, and then backlit the landscape area and wall behind it to create a layered effect. Your eye is drawn to the dramatic scene, and then you look down into the water to take in the patterning effect.
The lighting of the walls and landscape also draws the eye and defines the boundaries of the space. Again, the existing bamboo was an extremely important element, although all we really did was trim the stalks so the beautiful greenish gold would serve as a background for the scene, while at the same time picking up the greenish hues of the tile inside the spa. The simple uplighting draws your eye to the patterns of light and shadow, creating a sense of mystery and drama as your look beyond the yard’s intimate boundaries.
All of the lighting in and out of the pool works to create a variety of contrasts between light and shadow. The spa, for example, uses the light to illuminate the floor and the vertical surfaces, while the tops of the steps are left in shadow. In this way, we’re able to display the wonderfully complex qualities of the glass tile as well as the interesting configurations of the interior surfaces.
Around the pool the landscape lighting serves to not only light the greenery, but also to create contrast among the wall structures, decking and coping material. Patterns of light and shadow reward the viewer as they take in the scene more closely.
When you leave some areas in shadow, you create a sense of mystery while at the same time highlighting the elements that are most important. Rather than having the entire pool practically jump out of the ground at you because it’s so brutally lit, use patterns to draw the viewer the into the water and into the landscape, which is much more gratifying and interesting.
In effect, by not lighting everything, you create more to see. That’s the kind of visual dynamic you’ll never achieve by doing the same thing over and over again.
Comments or thoughts on this article? Please e-mail [email protected].